


Affiliate Disclaimer
Some links in this article are affiliate links. We may earn a small commission if you make a purchase through these links, at no extra cost to you. We only recommend products we find useful to our readers
Trying braids is like experimenting a new hairdo, with all the turns and twists to give your hair a peculiar style and the best part is you can try braids on every attire, have you ever tried braiding your hair to work or at a wedding?
Braids did not have many styles earlier, given the innovation in fashion there are many braids that have come up to ornament your hair and make it look noteworthy and classic. How magnificent would you look if you had a cluster of flowers all around your hair or for that matter if you had accessories stuck to your braided hair, wouldn’t it become a charming factor on your hair? Give it a thought!
To give you an outlook of what best you can do with braids on your hair, here is an article to help you understand the types of braids you can try and a gist of how you can make them. For all you know you would become a genius in perfectly twisting your hair with the different types of braids and you will get to come up with a braid style of your own.
Lovely Types Of Braids – Twist The Knots And Knot The Twists!
Deciding on which braid style is made for attire is all about your preference and creativity. That said, you should get to know about a category of braids that would look cool, pretty and attractive on your hair, these braids would not just accentuate the look on your hair but they would make your facial features look all the more attractive. Go through the type of braids and learn how to make each one of them
Type No 1 – Box Braids
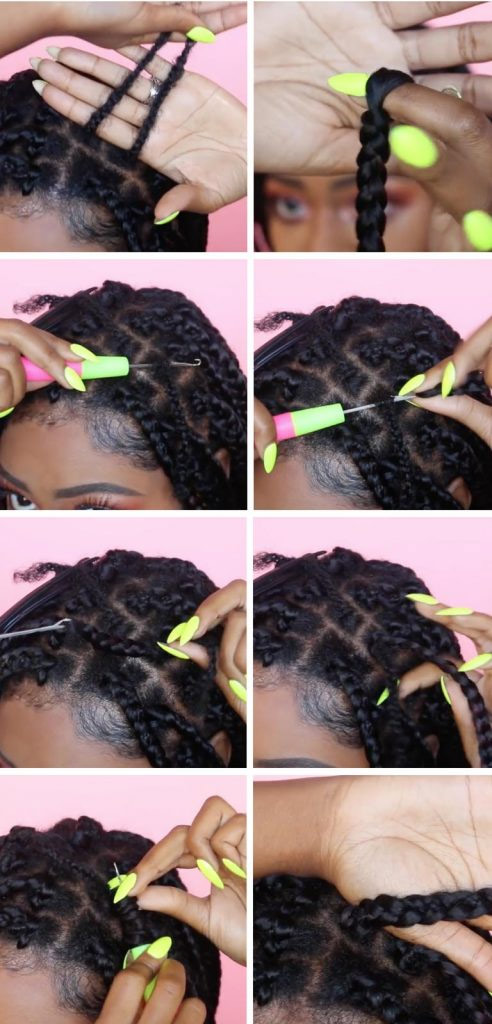
Box braids are just made for natural hair. If you have bushy hair strands and you want to design them and make them look cool you should try this style. This type of braid will go well with your jeans and t-shirts, skirts and middies and you can use colored tiny bands to lock the braids. To be more stylish with your hair you can braid it partially and leave the rest of it loose, tie up all the braids together or do a half updo with them.
What you Need To Do :
- Step 1 – Divide your hair into two parts
- Step 2 – Further divide the two parts into sub-parts
- Step 3 – Start to braid each sub-part
Steps to Braid the Sub Parts
- Divide the subpart in two sections, each section will be a braid
- Adjust the two parts of your hair that is going to get braided by stretching it left and right
- Now divide the two parts into further three pieces
- Overlap one piece to the other(middle piece of your hair to the left and then the new middle piece of your hair to the right)
- Rotate each piece back and forth before you twist them both into each other
- Towards the end of the braid just tie it with a colorful tiny band or just plain black bands
Continue repeating the same steps over all the sections of your hair.
Type No 2 – Dutch Braids
Dutch braids are also known as cornrows, and this braid style looks really cute and Buffy on the hair as it is a reverse version of french braids. Dutch braids look amazing when you wear a crop top and palazzo.
Dutch braids can be made on buns, they can be divided into two braids, you can do half dutch braid and leave the rest of your hair loose, a ribbon or ornamental hair accessories can be placed in between while making the dutch braids.
What you Need To Do :
- Step 1: Comb your hair neatly and get ready to start braiding it.
- Step 2: From the middle take a portion of your hair and divide it into three equal parts. Name the left as A, middle as B, right as C.
- Step 3: Take A(left section) and cross it under B(middle section).
- Step 4: Take C(right section) and cross it under B(middle section).
Here on you will have to add one part of the hair that is to your sides from the right and left alternately until the end.
- Step 5: Take one section of your hair from the left side and add it to the left section(A), now cross this combined hair under the middle section(B).
- Step 6: Take one section of your hair from the right side and add it to the right section (C), now cross this combined hair under the middle section(B).
- Step 7: Keep adding hair from the left and right and cross everything under the middle section and keep doing it till the end
You will find it tough when you begin, eventually, you will get a hang of doing it once you get used to the technique.
Type No 3 – Crochet Braids

Crochet braids are fine and well designed, their other name is latch and hook braids, the synthetic hair is twisted with your real hair and it keeps twisting through until the end. Crochet braids are heavenly because they look really beautiful.
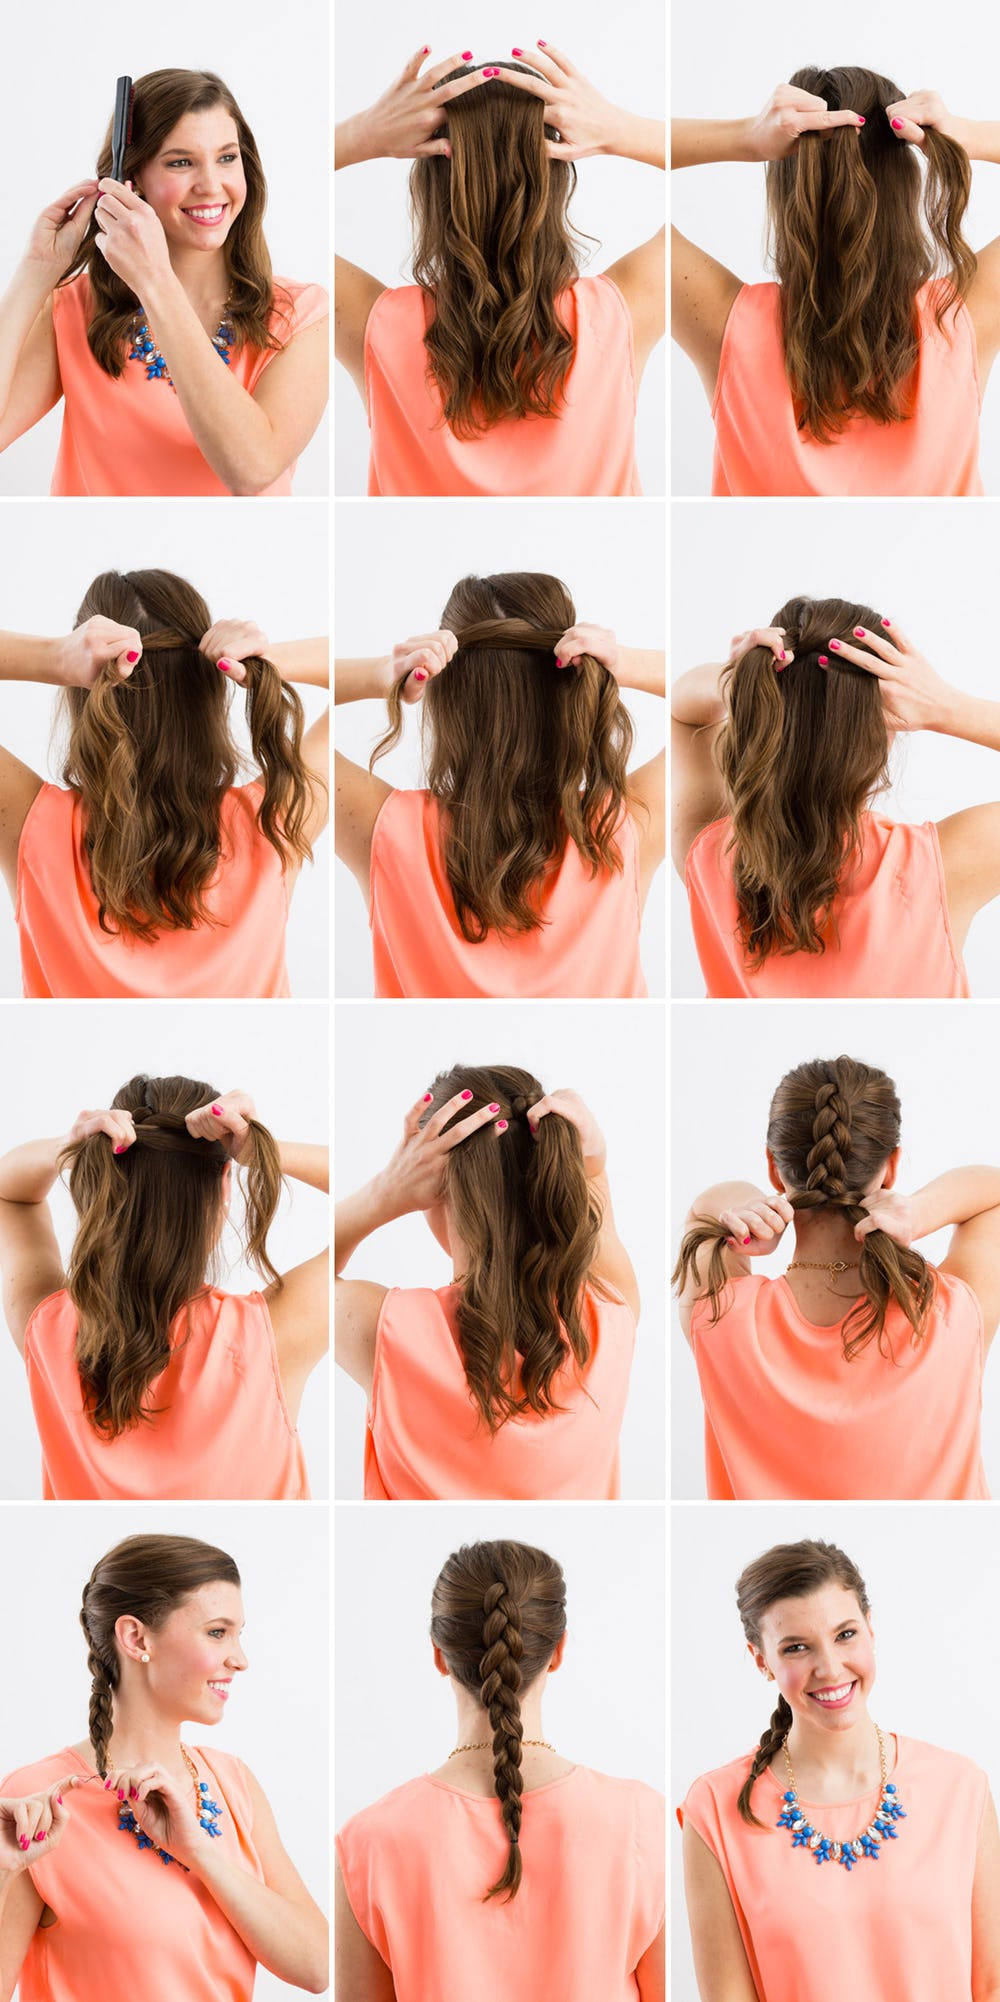
Type No 4 – French Braids
French braids have always been every girl’s favourite especially the ones who have long hair. French braids can be worn in the side, they can be worn as two french braids and as half-updo french braids. These braids can then be decorated in the most fantastic ways as well.
What you need to do :
- Step 1: Comb your hair neatly a get ready to start braiding it.
- Step 2: From the middle take a portion of your hair and divide it into three equal parts. Name the left as A, middle as B, right as C.
- Step 3: Take A(left section) and cross it over B(middle section).
- Step 4: Take C(right section) and cross it over B(middle section).
Here on you will have to add one part of the hair that is to your sides from the right and left alternatively until the end.
Step 5: Take one section of your hair from the left side and add it to the left section(A), now cross this combined hair over the middle section(B).
Step 6: Take one section of your hair from the right side and add it to the right section(C), now cross this combined hair over the middle section(B).
Step 7: Keep adding hair from the left and right and cross everything over the middle section and keep doing it till the end.
You will find it tough when you begin, eventually, you will get a hang of doing it once you get used to the technique.
[Also Read: Hairstyles with Braids for Long Hair]
Type No 5 – Lemonade Braids
Lemonade braids are just another variation or you can call it a style of braids for natural hair. This style was designed by Kim Kimble and all the braids are parted towards the side, they are a longer version of cornrows and they need to be maintained for them to last longer. That said, take a look at how to make lemonade braids.
What you need to do :
- Step 1: Comb all your hair on one side and push it all up.
- Step 2: Take another comb that has a sharp edge and then make side partition from every corner of the hair, right from down.
- Step 3: Start to braid all the sections of your hair bit by bit as neatly as you can. You can add hair extensions while you are braiding every bit of your hair.
This procedure is time consuming but it is worth a try.
Type No 6 – Three Strand Braid
Three strand braid is a basic braid and if you know this braid you can learn all the other braids easily. Three strand braids is the most frequently tried braid hairstyle. There are different ways of carrying this braid either by partially braiding the hair, braiding two sides of the hair or half braiding and leaving rest of the hair loose.
What you need to do :
- Step 1: Comb your hair well and remove all the knots.
- Step 2: Neatly divide your hair into three sections.
- Step 3: Bring the hair that is on the right section in between the middle and left section
- Step 4: Take the hair that is on the left section in between the right and middle section.
Continue this process until where you want the braid and tie a rubber band towards the end of your hair.
Type No 7 – Four Strand Braids

Four strands braid is well defined and more in detail, when compared to three strands, braid because there is another section of your hair that is fit into the twists, more the sections of hair and twists even better is the creative appearance of the braid. You should try this fancy braiding style and observe how beautiful it looks. There are different ways of doing a four strand braid, transfer four strand being the simplest of all.
What you need to do:
- Step 1: Comb your hair neatly and remove all the knots that are stuck.
- Step 2: Neatly divide your hair into 4 parts.
- Step 3: Name all the strands, you have an outer right, inner right, outer left and inner left.
- Step 4: Position your hands correctly, you should us your outer palms to help your outer left and right hair strands and use your finger and thumb to hold the inner left and inner right strand.
- Step 5: Take the outer right strand and leave it over the inner right strand
- Step 6: Leave the last strand that you are holding into the inner left hair strand
- Step 7: Then bring it over the outer left hair strand. This becomes the new strand.
- Step 8: Take this new strand, turn it over the inner right, under the inner left and then over the outer left strand.
Repeat this same procedure till down until where you want it and then tie your hair with a nice rubber band.
Type No 8 – Rope Twist Braid
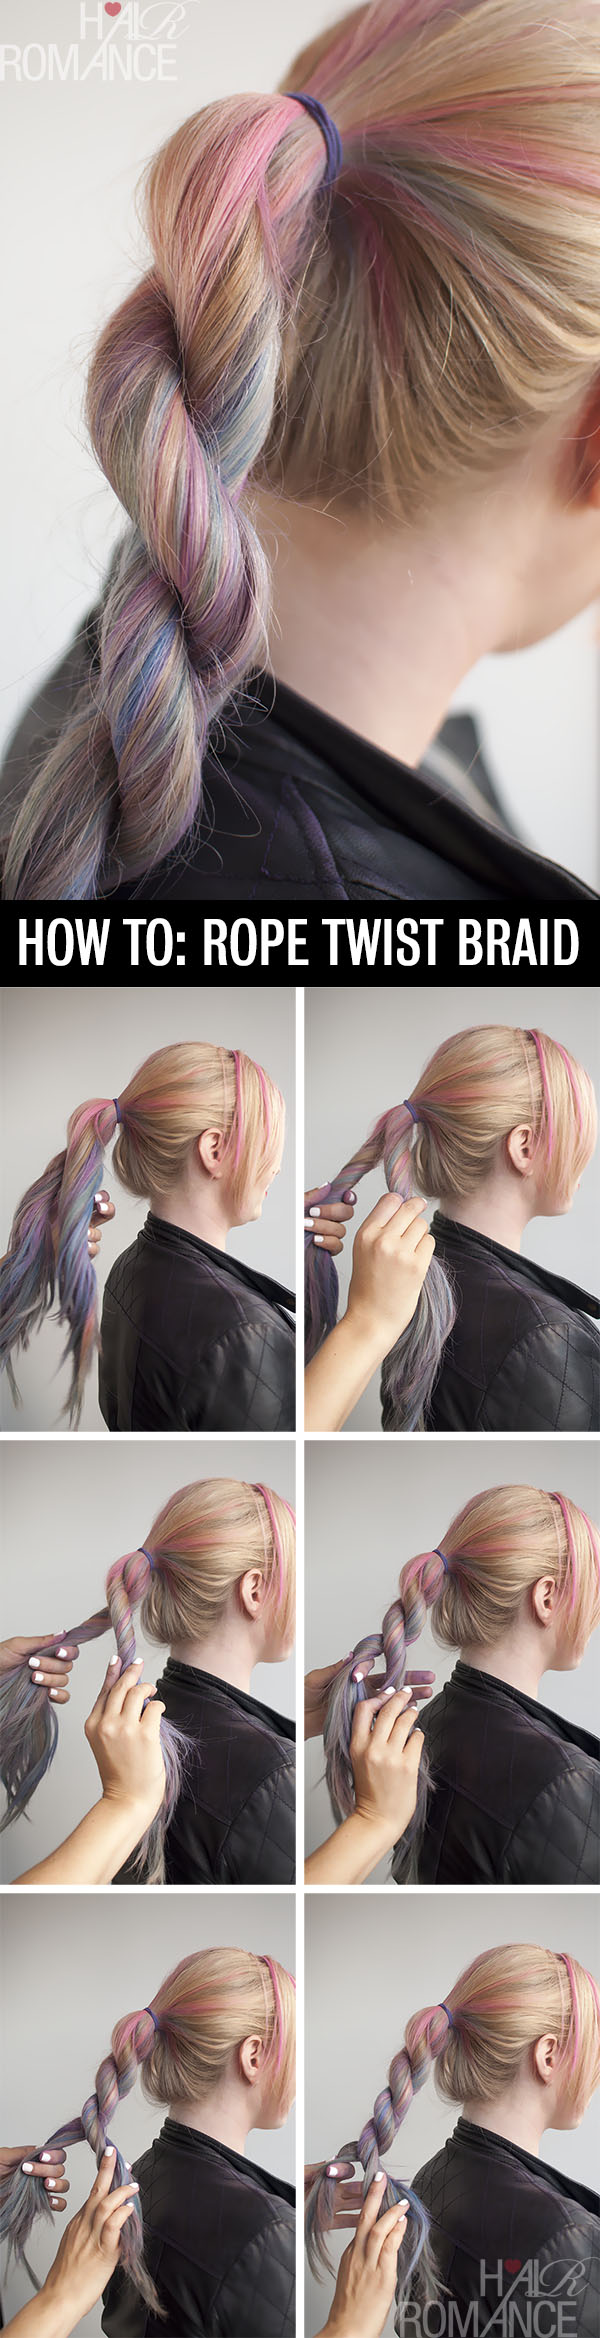
Rope twist braids look great on natural hair as well as silky hair. For those who have natural hair and you want to try a variation in your braid to make it looks full in volume then you should try the rope twist braids and for those of you who have silky hair you can as well try rope twist braids in a single ponytail or two ponytails or a half updo in the rope twisted braids style.
These rope twisted braids can then be decorated with colorful threads or round colorful pins. This braid style would just suit you so well if you are wearing a smart jumpsuit.
What You Need to Do If You Have Silky Hair:
- Step 1: Comb your hair neatly by removing all the knots.
- Step 2: Tie your hair into a ponytail.
- Step 3: Divide the ponytail into two sections.
- Step 4: Take one section of your hair and start to twist it as tight as you can.
- Step 5: Take the other section of your hair and twist it just like you twisted the previous section.
- Step 6: Start to twist the two together, place the right section of your hair over the left twisted section.
- Step 7: Give the left twisted section another twist and place it over the right twisted section of your hair.
Repeat this procedure until the end of your hair until where you want the rope twisted braid to come to an end and tie it with a rubber band.
What you need to do if you have natural hair:
To do the rope twisted braids on natural hair one will need a sharp tooth comb(pointed), hair clips and a hair protein gel.
- Step 1: Comb your hair neatly and remove all the knots.
- Step 2: Divide your hair in two sections and further make sub-sections through the edge of the fine comb.
- Step 3: Gently apply two drops of protein hair gel on the sub-section of the hair.
- Step 4: Initially start braiding your hair at least thrice and then begin twisting your hair.
- Step 5: As you braided your hair it must be divided into 3 sections. Its time that you now get your hair together in two sections and start twisting your hair at both the ends.
- Step 6: Re-twist the right section of your hair and put it over the left section
- Step 7: Twist the left section of your hair and put it over the right section. Keep twisting and putting the hair over the other like that of a rope.
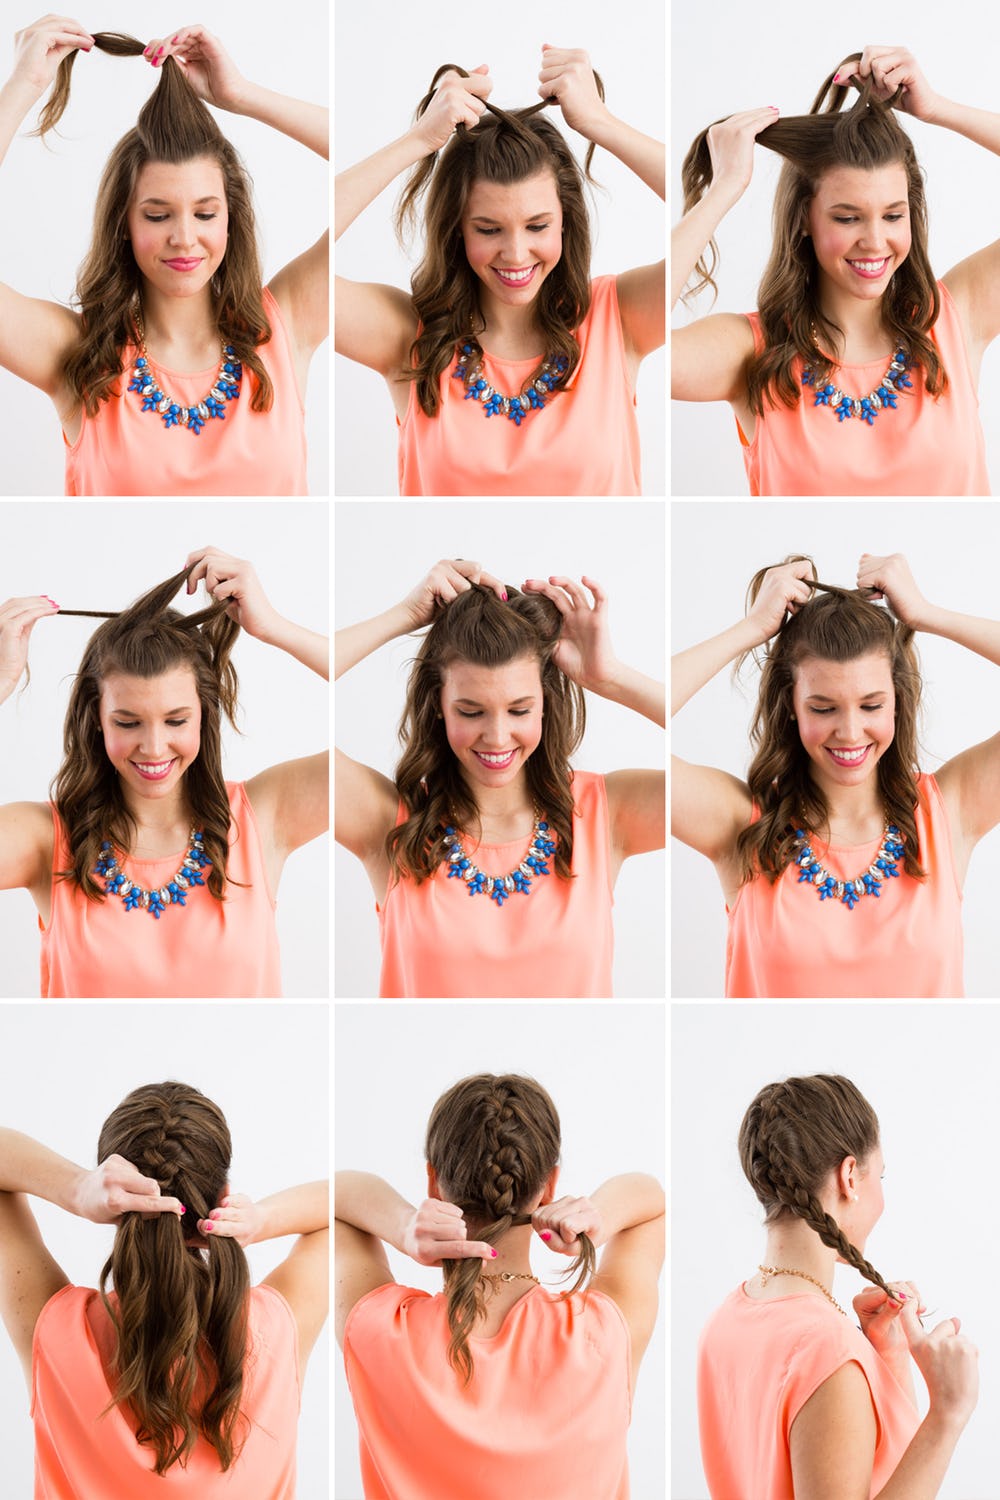
Type No 9 – Pull Through Braids

Pull through braids can be pulled through fun, formal and party occasions, this style of braid is as pretty as that of a healthy climber. In a way, this braid style resembles a heart shape. However, you must keep in mind that this braid style comes out really well after our braid it on an existing ponytail. It looks full and fancy on your hair.
What you need to do :
You will need at least 5 small rubber bands to try this braid style. This braid style is simple while you will be making several ponytails.
- Step 1: Comb your hair neatly and remove all the knots.
- Step 2: Take a portion of your hair and tie the first ponytail. Push the ponytail in front and clip that part of your hair.
- Step 3: Take another section of your hair from the sides and tie another ponytail. Now bring down the first ponytail by dividing this ponytail in two halves and bring up the second ponytail by clipping it in the front.
- Step 4: Then pull out another section of your hair and attach it with the hair that is down and tie another ponytail.
- Step 5: Bring down the ponytail that is clipped and divide it into two sections by taking in another section of the hair from your sides and clip the new ponytail up.
Repeat this procedure of dividing the hair and making another ponytail until down.
Now you will have the last ponytail with some of your hair left. Before you move on further, make all the previous loops of your ponytails voluminous by pulling them out from the sides and make them look large and bouncy.
- Step 6: Divide your hair that is left in two halves, push the tied ponytail aside and then tie your hair in another ponytail. Go on with this procedure until where you want to leave our hair loose and pull out hair from the loops at the side and make them look bouncy.
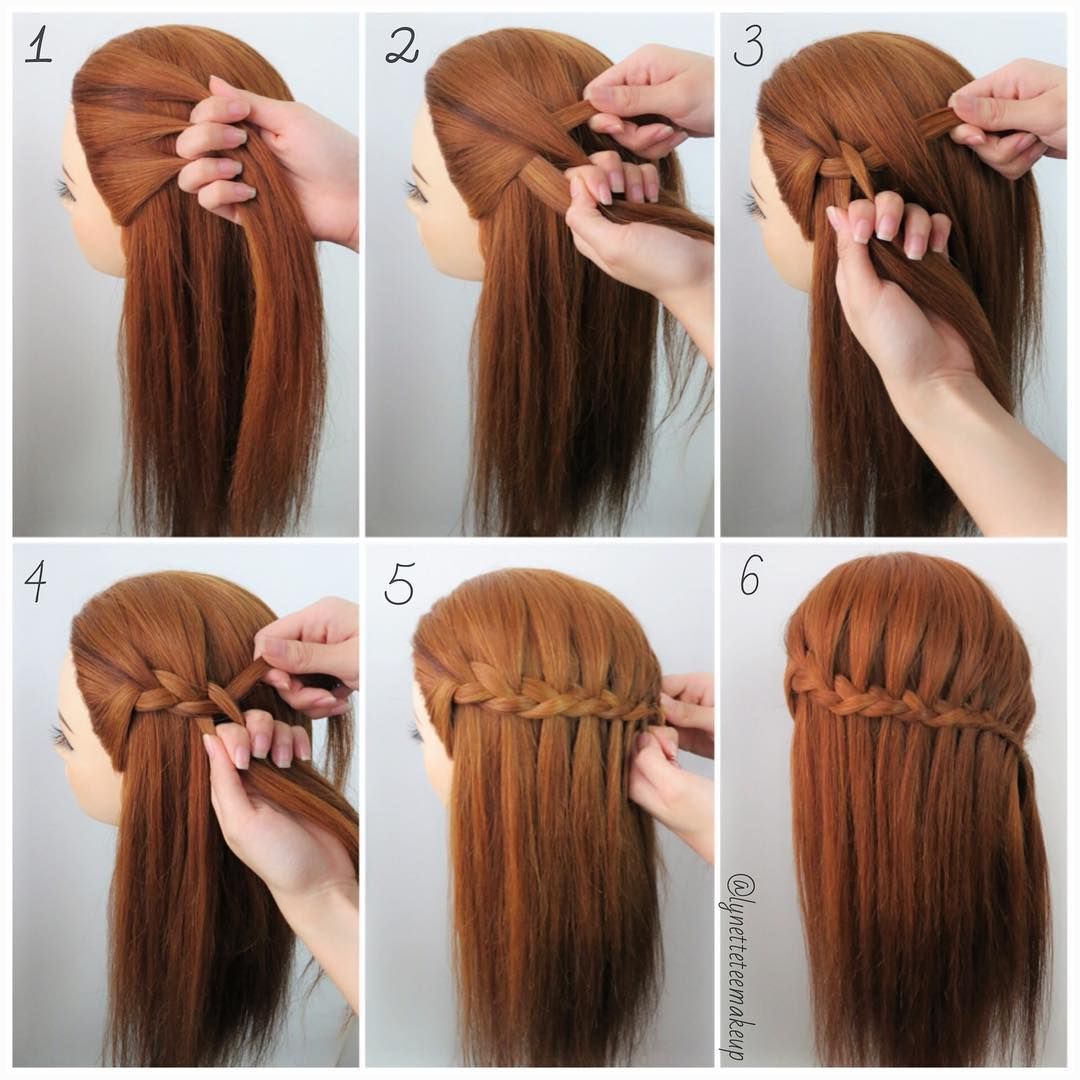
Type 10 – Waterfall Braids
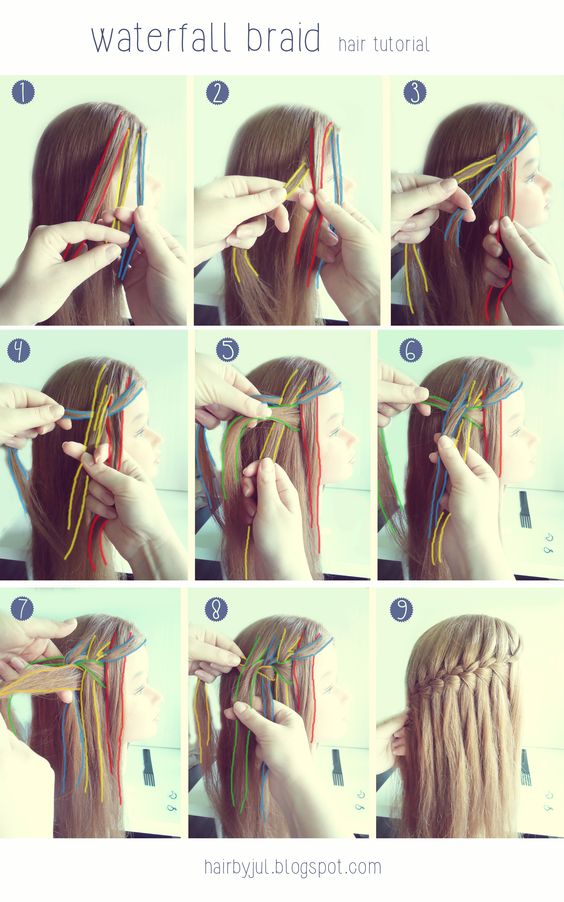
Waterfall braids are the best braid hairstyle when you want to go for a party and you want to make your silky straight hair look beautifully designed on your hair. They look fascinating if you can do a waterfall braid and tie the hair that is leftover or give it soft curls. You must try this hairstyle a least once for a party occasion and you will notice the number of compliments you receive once you have made this hairstyle.
Read this article to learn more about how to do a waterfall braids
Type No 11 – Milkmaid Braids
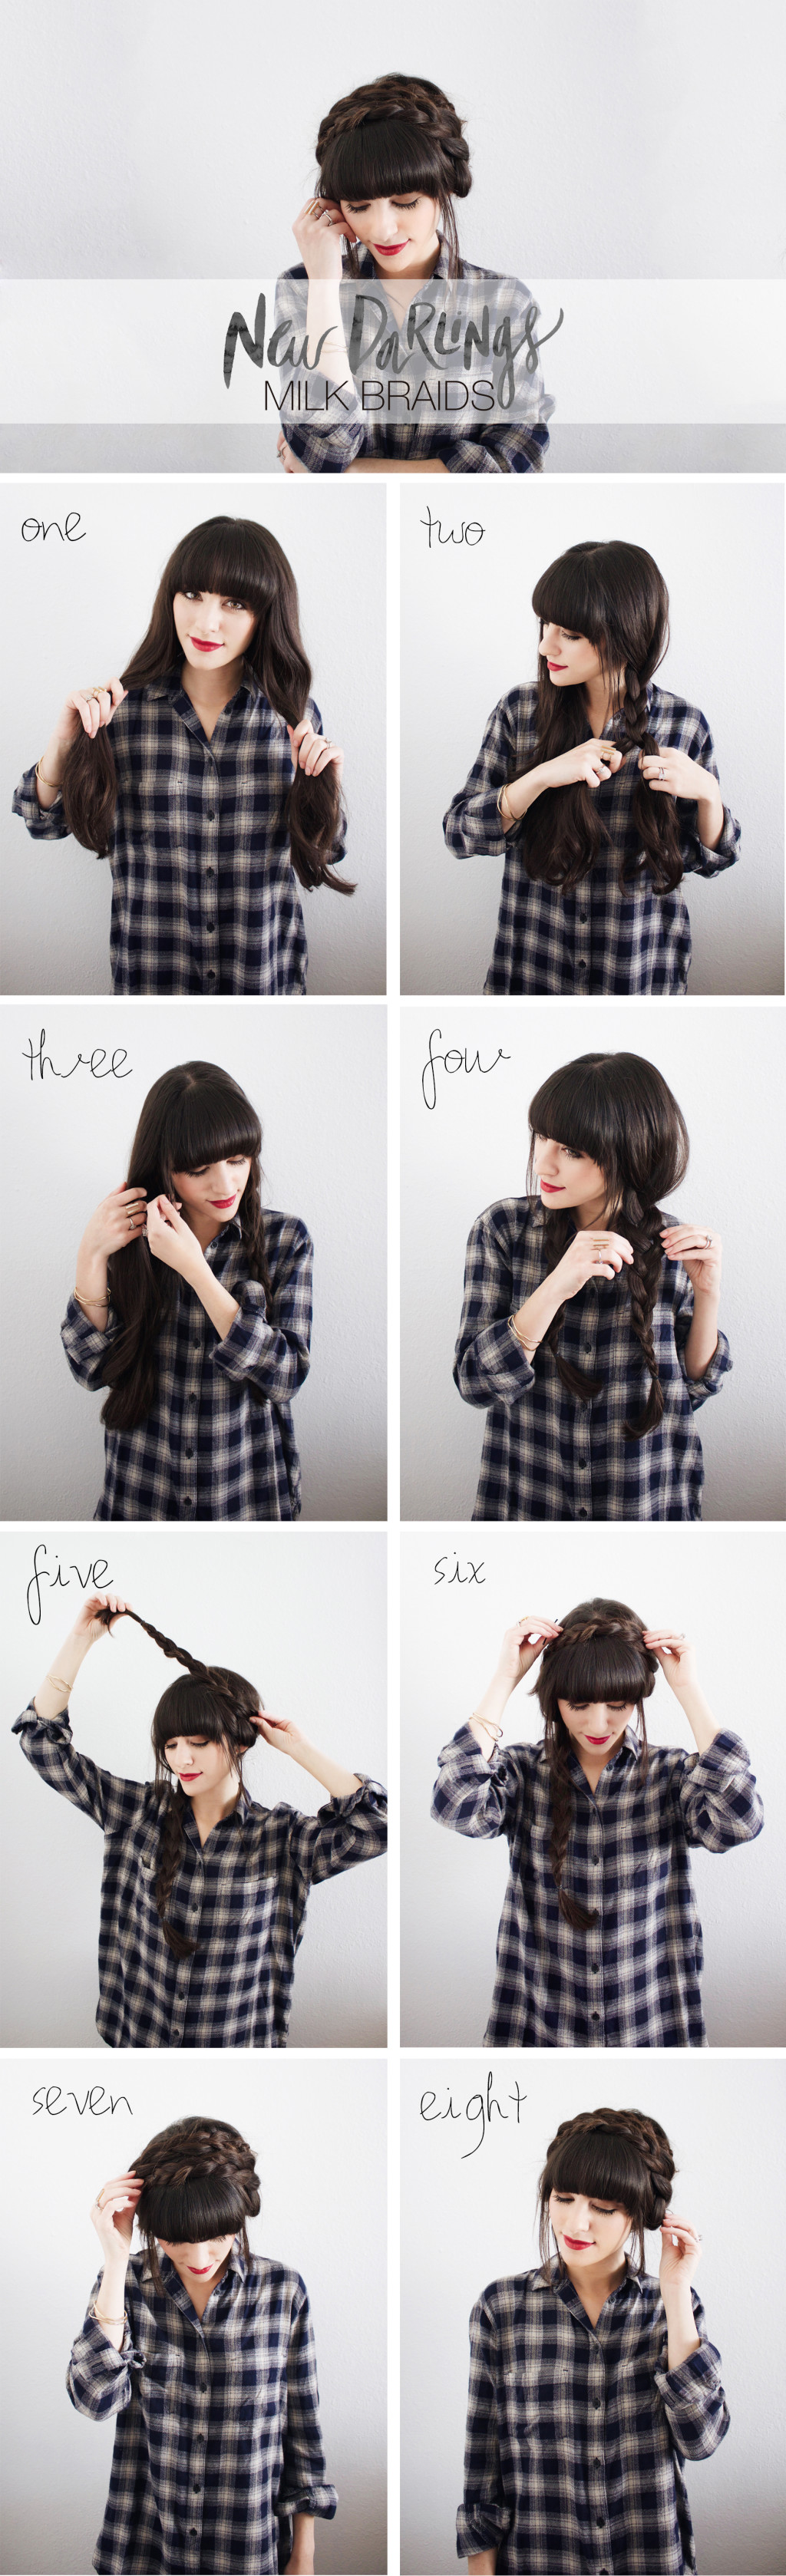
If you fancy crowned hairstyles then milkmaid braids is going to be an apt hairstyle you should try. Milkmaid braids look great for a bridesmaid hairstyle theme and they would look all the more amazing if you have to try this hairstyle as a theme for prom night as well. This hairstyle looks awesome when you wear on your long gown or a floral skirt and top.
Take a look at how to make this hairstyle
Type No 12 – Fishtail Braids
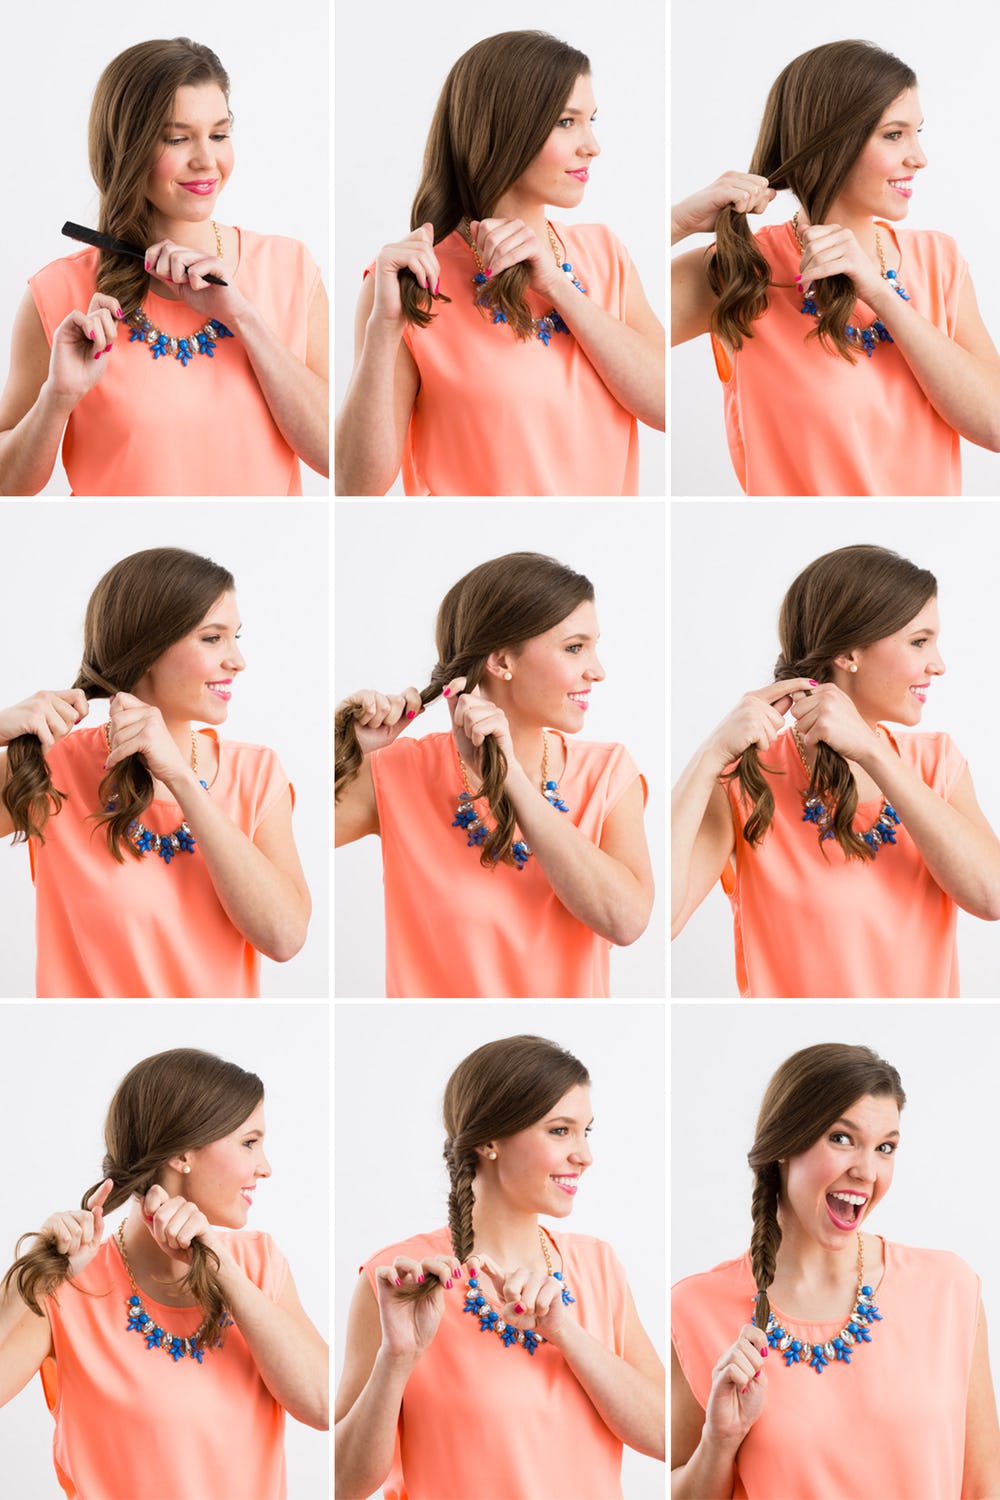
Fishtail braids are the most fragile and detailed of all the braid hairstyles, they add one kind of an enhancing feature to your hair. Fishtail braids could be made into a complete fishtail braid, half updo a fishtail braid, two ponytail fishtail braids or a messy bun fishtail braid.
Take a look at this video to get a clue on how to make a fishtail braid
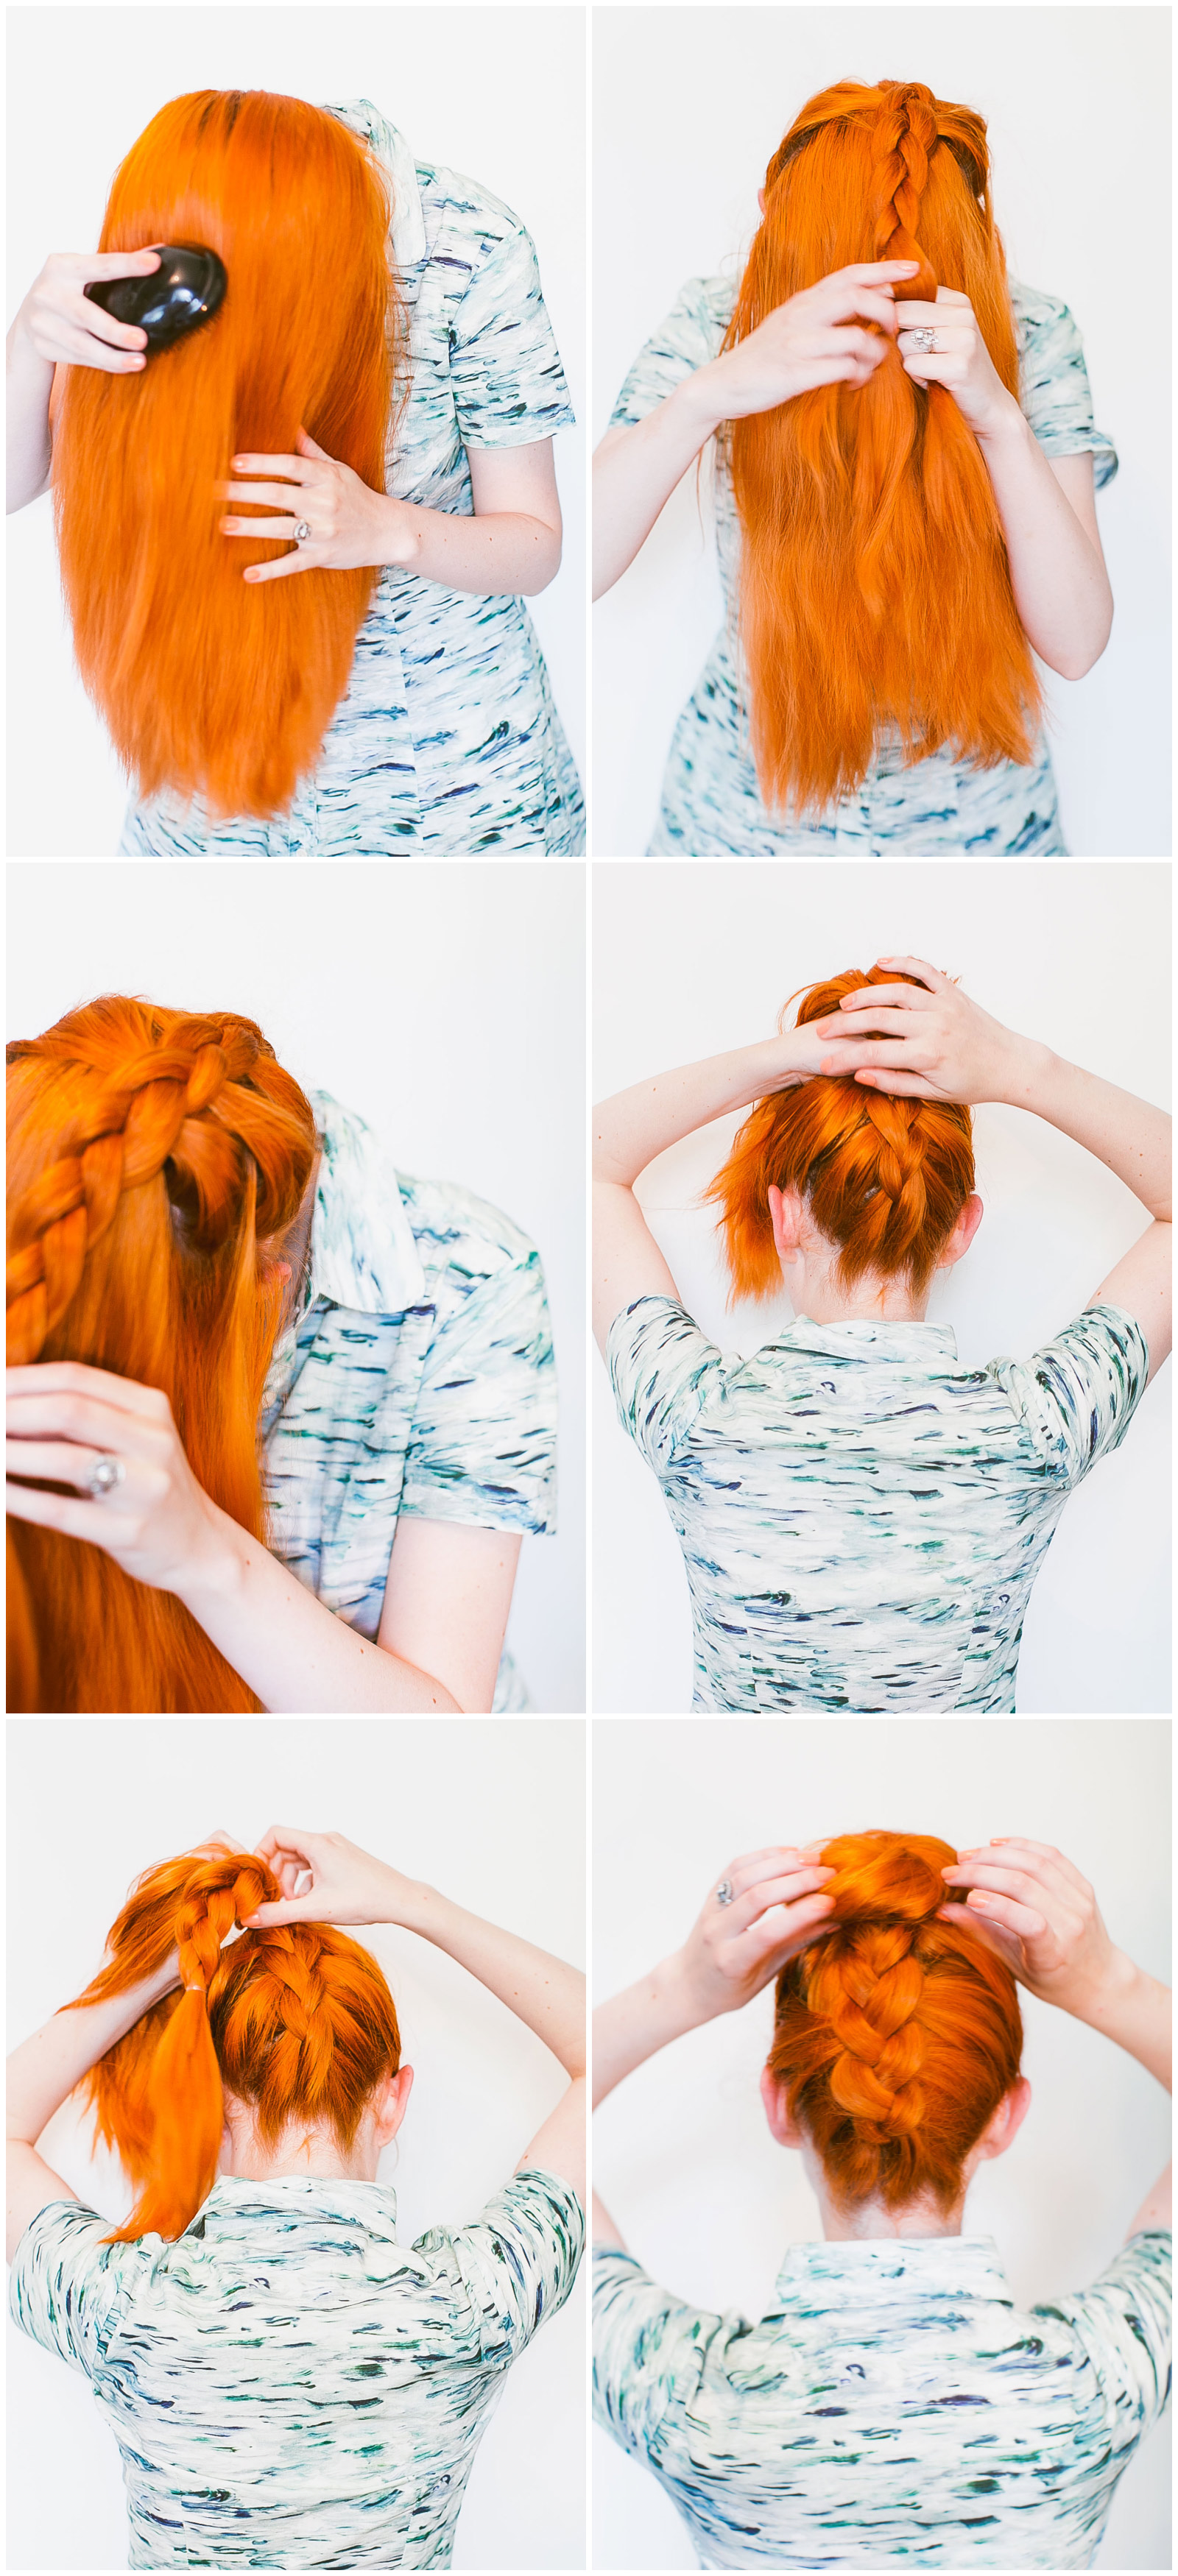
Type No 13 – Upside Down Braids
Upside down braids are the most suitable in the summer season as it takes all your hair up and you are free from your strands fiddling with your skin, the good news is that you can make the updo stylish and happening with an upside-down braid.
Take a look at this video and try an upside down braid to make your hair look smart and cute.
All in all, braids seem convoluted but they are really simple when you get acclimatized to the technique of completing the braid. That said, every braid is special and unique in its own way and none of them can be compared to the other because each style is detailed, has a great design and is fine and beautiful.
Try out all the braid hairstyles and make yourself look charming and attractive!


